Tuesday, March 31, 2020

Focus Stacking your way to images with more depth of field and cleaner backgrounds

Tom and I are making the best of this 'Stay at Home' directive by viewing it as our "Artist in Residence" period https://www.photographybylisaandtom.com/Creative/Spring2020-Artist-in-Residence/

What to do during this very strange time in our lives? It is scary out there, so we are staying inside and doing our part to flatten the curve by creating images with humor, creativity and/or beauty.

Join our email list and get content like this and more sign up here http://tinyurl.com/cuchara-photolist

We have also been photographing a lot using focus-stacking in-camera.

Focus stacking is the technique of taking a series of images, with the focus point at the closest to the camera and then moving it mm by mm towards the back of the subject. With dSLRs, focus stacking was tedious and took a lot of work in camera and in post-processing, and often requires extra equipment like focus rails, CamRangers, Cognisys, etc. Today there are are a bunch of cameras that will focus bracket in-camera, including the Nikon Z, Nikon d850, Fuji XT3, Panasonic and most Olympus cameras. The images are then layered into software (Zyreene stacker, Helicon Focus, or even Photoshop for the simpler series). Olympus cameras take this one step further and allow you to focus bracket, or to avoid the post-processing step and focus stack in-camera. This allows for greater depth of field, cleaner backgrounds, and more productivity.

How to focus stack: go to menu, camera 2, bracketing, focus bracketing, on. then choose focus bracketings (3-999 images) or focus stacking (3-15 images, EM1 mark 11 users if you only see 8 then you need to update your firmware), choose the differential (1-10, try 4-5 at first for most flowers and bug subjects). You can also focus stack with flash, the flash coordinates with the camera to recycle and go off for each focus slice.

* Focus Stacking available with OM-D E-M1 and E-M1 Mark II camera bodies using M.Zuiko Digital ED 12-40mm F2.8 PRO, 60mm F2.8 Macro, and 30mm F3.5 Macro lenses. ** Focus Bracketing available with OM-D E-M1, E-M1 Mark II, E-M5 Mark II, and E-M10 Mark II camera bodies.

We do most of our focus stacking with the 60mm macro lens https://amzn.to/39inhoA

Olympus STF-8 twin flash https://amzn.to/2UplERV
*Compatible with: M.ZUIKO DIGITAL ED 30mm F3.5 Macro, M.ZUIKO DIGITAL ED 60mm F2.8 Macro, M.ZUIKO DIGITAL ED 12-40mm F2.8 PRO

Focus stacking with Olympus means that straight out of the camera (SOOC) your image is sharp front to back with a beautifully blurred background. Sometimes you just need to shoot at 2.8-f4 in order to have a pleasing background, other times you need focus stacking because the subject has more depth of field than f22 will give you.


For this image, taken last year, f2.8 gave a nice background but the poppy was not sharp through and through. f22 resulted in a sharper poppy, but with a trade-off of a distracting background. 8 images focus stacked in-camera at f2.8 gave the best of both worlds.

I just love the backgrounds with focus-stacking. I often choose a background first and then find a subject to place in the background. 


I just love the backgrounds with focus-stacking


I was photographing this preserved moth, above, when I kept hearing fluttering. This Cecropia moth had emerged early...


 The 60mm lens is effectively 120mm with a 2:1 life size ability. I use if as a closeup lens for ~80% of my images, but with the flick of a lever you can take the lens into true macro range like with the closeup of this Cecropia moth

Live critters, like these little lemur frogs, sometimes will sit still long enough for you to focus stack, but start with things that do not move

The rhino beetle is a preserved specimen, but the Amazon Milk frog was alive and hopping. I have a way of walking to my froggies and they will often settle down quite nicely, like this little froggie did -- so I could focus stack this to have the beetle sharp through and trhrough.

Monday, March 30, 2020

Backyard bird photography

Tom and I are making the best of this 'Stay at Home' directive by viewing it as our "Artist in Residence" period 

We are staying inside and doing our part to flatten the curve by creating images with humor, creativity and/or beauty. Check out some of the images that we have created in March here:  https://www.photographybylisaandtom.com/Creative/Spring2020-Artist-in-Residence/

Tom has been busy outside with some backyard bird photography. Read about it here:


Join our email list and get content like this and more sign up here http://tinyurl.com/cuchara-photolist

Sunday, March 29, 2020

Making the best of this 'Stay at Home' directive by viewing it as our "Artist in Residence" period

Tom and I are making the best of this 'Stay at Home' directive by viewing it as our "Artist in Residence" period

We are staying inside and doing our part to flatten the curve by creating images with humor, creativity and/or beauty. Check out some of the images that we have created in March here:  https://www.photographybylisaandtom.com/Creative/Spring2020-Artist-in-Residence/

We started a series on toilet paper...I know that we have some more ideas to add to this TP series, see more here: https://www.photographybylisaandtom.com/Creative/COVID19-Pandemic-Series/


Join our email list and get content like this and more sign up here http://tinyurl.com/cuchara-photolist


Friday, March 27, 2020

Lightpainting Food

Tom and I are making the best of this 'Stay at Home' directive by viewing it as our "Artist in Residence" period

We are staying inside and doing our part to flatten the curve by creating images with humor, creativity and/or beauty. Check out some of the images that we have created in March here:  https://www.photographybylisaandtom.com/Creative/Spring2020-Artist-in-Residence/

Lightpainting is a lot of fun! And even more so with LiveTime and Live Composite on our Olympus cameras. With LiveTime and Live Composite you can SEE the Night, star, lightpainted, etc. image developing on the back of the LCD, you follow the histogram and the exposure builds, both of which make lightpainting and night photography more FUN -- and more productive!

LiveTime is sort of like Bulb mode meets Polaroid, where you can see the histogram and the image develop on the back of the camera.

LiveComposite is like Bulb Photoshop meets Bulb mode meets LiveTime, like LiveTime, you see the histogram and the image develop on the back of the camera. But better than LiveTime, you expose a base exposure first (for the ambient light) and then you keep exposing one frame at a time adding only NEW light. This is perfect for night scenes where there is street lights, light pollution, a lighthouse, etc. -- and also great for lightpainting inside or outside. I can lightpaint in my house in the middle of the day. The first image is a half-second image and then, no matter how long I expose for, I do not get any more ambient light.

Live composite. This was taken in the middle of the day, so I set the interval time to a half-second. ISO 200. f11 This image was 115 half-second images stacked on lighten blend mode in-camera. I was painting with a flashlight during the exposure, making sure to have the light at a 90 degree angle to get as much texture as possible. The resulting image takes on a painterly, Rembrandt-y feel.

The mushroom itself was chosen because it was interesting looking, but the above light painted version has a lot more texture and appeal. 

 For this image, I duplicated the lightpainted mushroom four times and flipped each one.

For this image, I applied Topaz Glow after I duplicated/flipped the lightpainted mushroom four times.

For this image, I applied Topaz Glow after I duplicated/flipped the lightpainted mushroom four times.

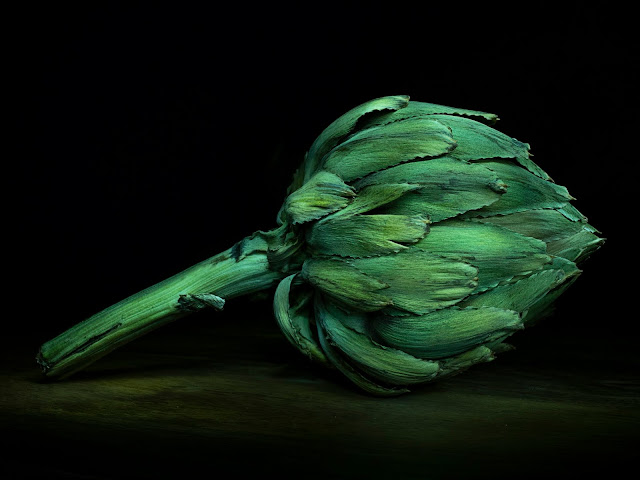
Artichokes have a lot of inherent texture, but lightpainting them really makes the image look three dimensional and painterly. 127 half-second frames, stacked in-camera on lighten blend mode. f11 ISO 200

Artichokes have a lot of inherent texture, but lightpainting them really makes the image look three dimensional and painterly.

  1. The setup can be done anywhere, here it is on my dryer, a $5 black science poster board from Staples and a $1 black base from the dollar store. A microfiber cloth is useful to keep dust off the base. 
  2. Lighting: Take an empty toilet roll and cut a bevel in one end and place black gaffers tape or electrical tape all over it. Or purchase a flexible flashlight https://amzn.to/2wzr5EN 
  3. Light paint from the side, at a 90-degree angle, do not light paint from the camera, that will give flat light (flat light is great for photographing women's face, but we want texture in our light painted subjects)

Join our email list and get content like this and more sign up here http://tinyurl.com/cuchara-photolist